Tiny Home
About
In an effort to maximize the utilization of The Prairie, so my parents and relatives that aren't able to do traditional camping or don't enjoy camping can enjoy the prairie too. I've decided a tiny home would be a good way to do that.
This page functions as an easy way to share the ideas with others as well as a central place for me to keep my notes. If you're not worried about the math, or want a slightly more amusing read, view this version of the page that uses unusual units.
Schedule
| Date | Tasks | Attendees |
|---|---|---|
| June 14 | Septic tank, Cement piers, Ground prep | Jake, Greg, Mum & Ken |
| June 20 | Prep jobsite, Lay beams | Jake, Meagan, Nick S |
| June 21 | Framing, Roof trusses, Roof sheathing | Jake, Meagan, Meagan's Parents, Nick B & Ashley, Christian & Evelyn, Nick S, JR, Zach |
| June 22 | Tyvek, Windows, Door, Roofing | Jake, Meagan, Meagan's Parents, Nick B & Ashley, Christian & Evelyn, Nick S, JR, Zach |
| June 23 | Flashing, Exterior Insulation, Siding | Jake, Nick B & Ashley |
| June 24 | Floor insulation | Jake |
| June 25 | Bed frame, Flooring | Jake |
| June 26 | Electrical, Plumbing | Jake |
| June 27 | Insulation | Jake, Meagan |
| June 28 | Outstanding items | Jake, Meagan, Nick B & Ashley, Meagans Parents |
| June 29 | Outstanding items | Jake, Meagan, Nick B & Ashley, Meagans Parents |
Structure
Since there's 3 hours worth of driving between me and the location this will be built, I've attempted to leave nothing up to chance and instead, fully lay everything out in CAD before we even pick up a shovel.
A note for my future self: frost depth is 42" and snow load is 60lb/sqft. Cheboygan uses the 2015 Residential Building Code for dwellings; it's not relevant for this project, but it has good guidelines. Part 8 of this document is a handy checklist. This page and this page have some good info for notching joists. This page has some good info for floor joist sizing.
View studs-only model full screen
View studs-only pdf drawings
Legally this building is too small to be considered a home of any sort, so it's instead classified as a Personal Storage Facility. I'll elaborate on why that's interesting in the future.
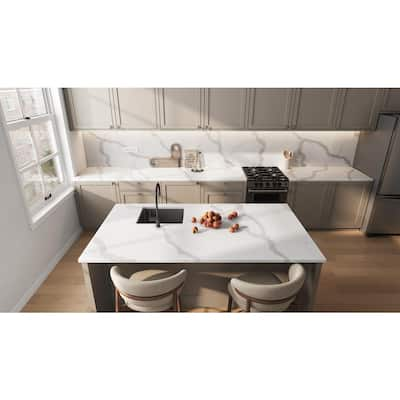
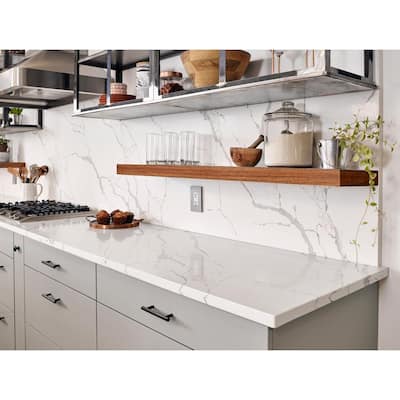
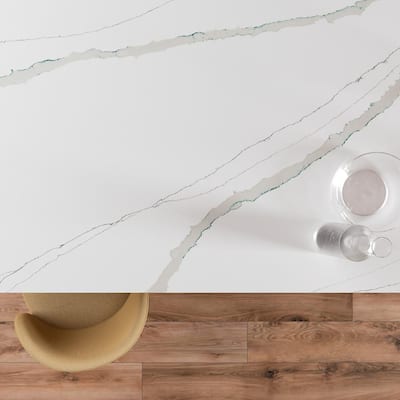
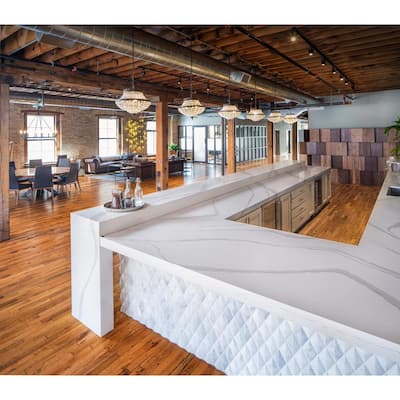
Kitchen
We don't have enough money to get marble counters in our kitchen at home, so we're taking this opportunity to get them for the tiny house. Marble is an expensive and fickle material, so we'll actually be getting a quartz counter that looks similar. Meagan has picked out these color patterns from home depot: Silestone Quartz Bianco Calacatta, Stonemark Quartz Calacatta Laza, Viatera Quartz Calacatta Verde, Cambria Brittanicca. Looks like the counter is going to be $1800.
Insulation
Since the tiny house is in Zone 6, the 2021 IECC Insulation Requirements suggest the tiny home has ceiling, wall, and floor R-Values of 60, 13+10ci, and 30, respectively. This results in the following layers of insulation:
- Ceiling
- R-13 Foam board between the rafters with 1" gap below the roof deck to allow for airflow
- R-30 Thermafiber between the rafters against the bottom of the insulation board
- R-6 foam board between the rafters against the bottom of the previous batting
- Walls
- R-15 Comfortbatt between the studs
- R-13 Insulation Sheathing on the exterior under the siding
- Floor
- R-23 Comfortbatt between the joists against the floor decking
- R-13 Insulation board between the joists under the comfortbatt to hold it up and protect it
Electrical
All appliances (water heater, HVAC, cooking, etc) will be electric. This simplifies the user experience when staying at the tiny house: if batteries are dead, nothing works; otherwise, everything works. None of that checking if the propane tank is low or having to leave to get fuel for a generator or anything.
Power Requirements
Heating the tiny home during the dead of winter will be the toughest energy challenge, so this is what we'll size the solar system to. The sun is low, weak, frequently occluded by clouds/precipitation, and only shines in a useful manner for ~5 hours per day. Meanwhile, the tiny home has to keep itself above freezing during the coldest weather of the year.
My highest gas bill (used almost exclusively for heating) for my house last winter showed 734 cubic feet of natural gas per day. The U.S. Energy Information Administration says each cubic foot contains 1057btu of heat. My house is 2050sqft, so divide the energy usage by 10 to get something close to representative for the 200sqft tiny home. HeatingEnergy = 734cf/d * 1057btu / 10 = 77583btu/d => 22.7kWh/d. So, 22.7kWh is an incredibly high number, so high that I can't even dream of getting that much solar in the dead of winter with the poor solar conditions.
Luckily the energy usage for heating the house is based on keeping the inside at 20°C, while the tiny home only has to be at 3°C to weather the winter. Weather Underground has historical data for the Pontiac airport in January, which shows the average temperature was -3°C. A quick subtraction shows the energy the house used was to keep it 23°C warmer than outside, while the tiny home only needs to keep it 6°C warmer than outside, which means the new heating energy estimation is now 22.7kWh/d * 26% = 5.9kWh/d. This is still quite a lot, but much closer to feasible.
Turns out there's a scientific way to estimate how much heating and cooling is required, known as Block Load. By punching in the data for the tiny home, the calculator spits out these results. Much to my surprise the estimated heating load (1.7kWh) is much lower than my guestimation based on my home's gas bill.
Currently looking at the Mitsubishi JP09WA minisplit system.
Photovoltaics Location
Everything being electric obviously puts a pretty large load on the electrical system. The first thing to consider is solar harvesting, if we can't collect enough sunlight, it doesn't matter what else we do, nothing will work. The initial plan was to load the roof up with solar panels, but after some quick napkin math it was clear the roof isn't nearly big enough for that. Now the plan is a two low height ground mounted arrays, short enough that the natural wild grass will block them from view.
Figuring out where to put the panels isn't too tough, just a matter of measuring the height of me (1.8m), taking a photo of me in front of the biggest tree south of where I want the panels (white dot in below image), then calculating the height of the tree from the photo (14.4m). Next was determining how far back to set the panels so they don't get blocked by the trees. The following paragraphs use 15° as the target angle, so we'll solve for that while assuming the panels are directly on the ground. Setback = 14.4m / tan(15°) = 54m (magenta line in below image). This setback is for the leading edge of the closest panel. Since we're splitting the array into two racks, the second rack will need a setback of 1.1m panelWidth / tan(15°) = 4.1m from the rearmost edge of the first racks solar panels. Since we're running numbers for the panels being on the ground, we'll need a clear area infront of the panels with no tall vegitation so the panels don't get shaded by the wild grass. Assuming the grass is also 1m tall, we can reuse the 4.1m from the earlier calculation. The total solar panel installation area will therefore be roughly 4.1m + 1m + 4.1m + 1m = 10.2m deep by 7m (using numbers from a paragraph below). This area is marked as orange boxes for the solar racks and blue boxes for the low/no vegitation areas.
Using 8x 450W panels, referencing the Solar Atlas, and assuming we position the array at 20° to collect direct sunlight when the sun is ≥15° in the sky, this array will only collect 5kWh of energy over the 4 hours of sunny daylight in the dead of winter. The bonus here is when the array is adjusted to 50° these same panels will generate 16kWh per day from March to August, which covers prime camping time. That huge amount of power helps justify the investment to survive the winter, if the array is large enough to survive the winter then it'll also be large enough to keep the tiny home uncomfortably cold all summer.
Victron CalculatorThe solar array will be split into two racks. Each rack will have the panels mounted landscape. This gives each rack dimensions of roughly sin(70)*1.1m panelWidth + 0.2m stilts = 1.2m tall and 1.8m panelLength * 4 panels = 7m long. They'll be so short since they're mounted on very short stilts, less than half a meter tall. Keeping them short lets us hide the panels in the tall grass to keep them out of sight; after all, the point is to enjoy nature, not stare at the back of power equipment. The racks will be configured with two position capabilities, winter and summer angles. During summer we'll set the panels to be perpendicular to the sun at an average elevation of 50°; similarly, winter will be 20°.

Energy Management
The current plan for energy storage is a single 52V 10kWh lithium battery. We'll start with one battery for now, but build everything to accommodate two if we decide to get a second in the future.
For charging the batteries, a Victron MPPT charger will do the trick. With this charge controller I'll be able to run the solar panels in series, up to 250V, which will help minimize transmission losses in the wires between the panels and the tiny home. The current plan is two strings of four panels, resulting in Impp = 30.5A and Voc = 139.6V, well within the capabilities of this charge controller. The batteries themselves are rated for 100A charge current, so no worries there. Connecting the panels to the tiny home will be the job of two 4AWG wires, totaling 36m round trip, aka 0.03Ω, so we'll lose about 0.9V ⇒ 28W ⇒ 0.8% of the generated energy in the wires, that's within tolerance. To start, both strings of panels will be connected to the same solar charge controller. In the future I may rewire the panels to put each string on its own controller, potentially increasing the efficiency of each string when the southernmost string is shaded in the morning or evening.
To convert the battery power into useful power, a Victron MultiPlus-II inverter/charger will be used. This will be connected to the batteries and will feed 120VAC into the electrical panel in the tiny home. From the panel, it's just normal house wiring to the outlets and switches in the building.
During overload conditions, the Ekrano will use two load shedding devices to prevent a blackout. The load shedding will be handled by solid state relays. They cost significantly more, but they only require 0.7W to power the load, while a typical contactor requires 9W to keep the contacts closed. Currently the plan is for one of the devices to be connected to the water heater to reduce load when the battery gets low as well as overload situations. The second device will be connected to something else; not sure if it will be the stove, HVAC, microwave, 30A outlet, or something else.
PVC conduit will be used to connect the two solar strings together, and tie them to the house. then another set of conduit will be used to connect the inverter to the subpanel. 1" conduit will be large enough to hold all the wires for the solar arrays to be independent and large enough for the wire between the inverter and panel, so we'll standardize on 1". So in all I'll need 8 street 90s and 80' of conduit to connect everything.
Load Center
The Victron Inverter will feed 120V to a 100A load center, with both legs of the load center tied together. There will also be a generator inlet on the back of the house to allow powering everything up via traditional fuel burning if the need arises; this inlet will connect to the inverter to allow the generator and inverter to work together as well as charge the batteries. The circuits coming from the load center will be as follows:
- 20A - water heater
- 20A - bathroom outlets
- 20A - kitchen outlets A
- 20A - kitchen outlets B
- 20A - outdoor outlets
- 20A - remaining outlets
- 20A - dishwasher & garbage disposal
- 20A - cooktop
- 20A - microwave outlet
- 20A - HVAC
- 15A - lighting
- 30A - RV outlet

Network
This is certainly the most complicated network I've assembled thus far. Not because of how many nodes there are, but because of how many different physical layers there are. This network goes from the super complex LTE all the way down to the most fundamental discrete IO. This diagram is equally to show what's going on as well as to help me keep track of the obscene number of connections, connectors, and cables tying everything together.

Plumbing
In the spirit of off grid, the goal is to use rainwater as the sole source of water for the tiny home. Rainwater is close enough to clean that we can use it without any sort of filtering. Roof runoff, on the other hand, is what we're actually collecting and that is not even close to clean. A first flush gutter diverter will divert the first several gallons of rainwater to the ground, then all the water after that will be routed to the 100 gallon rainwater tank inside. The backside of the roof is 214sqft, which will fill the 100 gallon tank with only 3/4" of rain. This simplifies things, since the front roof is relatively tiny, it's not worth running plumbing to the front to catch that little extra. The rainwater tank has an overflow that will let excess water drain out to the ground when it's full. This way the water gets refreshed whenever possible to avoid keeping stagnant water in the tank indefinitely. Standard home water filters of decreasing pore size will be used to clean the rainwater. The water won't be safe to drink, but it will be fine for hand washing and the ilk.
The main gotcha with building a private storage facility, is it can't have a shower per code. Fortunately, sinks and toilets are legal though. Possibly the feature that makes this most similar to a normal house is the septic field. There's just no good way around having a septic field, both code and practicality require it. The bad news is Cheboygan's minimum septic system size requires a 1000 gallon tank; so even though the tiny house needs minimal septic capabilities, the septic must be sized to handle a two bedroom house.
A septic system is a bit of a chore to implement on the prarie. By looking at my neighbors Water Well and Pump records from EGLE, it's simple enough to get an idea of the soil competition: Clay and Hardpan, brilliant. This precludes standard gravity septic systems, so we'll need something significantly more costly.
Now that future me has solved the septic problem, I can now talk about it. The septic system was indeed unable to be put in the ground. But, instead of putting it in the ground, we put it on the ground, then covered it in better ground. What happened was the septic tank was buried very shallow, then sand was dumped all over the area, then the drainfield was put on the sand, and more sand put on top of that then finished off with a layer of dirt. Because the tiny house is on piers, we had enough fall to allow everything to be gravity fed even though the system is mostly 'above grade'. Thankfully everything worked out so there was no need for any expensive and power hungry dosing pumps or anything.

I'm a fan of copper plumbing personally, but due to freeze risk I'm willing to make the sacrifice and go with PEX. I estimate 60ft of blue PEX, and 20ft of red PEX.
The tricky part is getting all of this to survive the winter. Winterization is the absolute last resort, hence why all the plumbing is indoors with the exception of the gutter and diverter. The current plan is to keep the inside of the building above freezing, ≥3°C, to protect all the indoor plumbing.
Cost
Here's the not fun part, this project is going to cost a shitload. It's hard to keep track of the projected cost as the design progresses, but here's what I got so far
| Item | Qty | Unit | Total |
|---|---|---|---|
| STRUCTURE | |||
| "12x48 Quiktube"* | 10 | $13.99 | $139.90 |
| 56 80# bag quikcrete delivered* | 1 | $414.44 | $414.44 |
| 50# Gravel | 5 | $7.79 | $38.95 |
| 1/2" x 10' Rebar | 7 | $5.26 | $36.82 |
| Auger operator for piers* | 1 | $400.00 | $400.00 |
| --Bernard Building Delivery Jun 20-- | |||
| 1x6x12'* | 5 | $12.68 | $63.40 |
| 1x8x8'* | 3 | $12.02 | $36.06 |
| 2x4x8'* | 111 | $3.84 | $426.24 |
| 2x4x10'* | 28 | $5.12 | $143.36 |
| 2x4x12'* | 7 | $6.50 | $45.50 |
| 2x4x16'* | 12 | $9.45 | $113.40 |
| 2x6x8'* | 10 | $6.75 | $67.50 |
| 2x8x10'* | 19 | $9.14 | $173.66 |
| 2x8x12'* | 11 | $11.17 | $122.87 |
| 2x10x8' Ground Contact* | 3 | $13.26 | $39.78 |
| 2x10x20' Ground Contact* | 4 | $41.81 | $167.24 |
| 2x12x8'* | 18 | $14.48 | $260.64 |
| 2x12x12'* | 15 | $20.97 | $314.55 |
| ½"x4'x8' OSB* | 35 | $13.89 | $486.15 |
| ¾"x4'x8' OSB* | 8 | $20.55 | $164.40 |
| 1-3/4"x11-7/8"x20' LVL 2.0e* | 2 | $142.59 | $285.18 |
| Hurricane Tie* | 40 | $0.94 | $37.60 |
| Certainteed Ice & Water Shield, 2 SQ* | 1 | $94.04 | $94.04 |
| SLR 16" x 10'4"* | 17 | $45.76 | $777.92 |
| SLR 29GA 16"x4'* | 17 | $17.60 | $299.20 |
| SLR 29GA Ridge Cap 10'4"* | 3 | $34.90 | $104.70 |
| SLR Gable Trim 29Ga 4 ½" x 10'4"* | 3 | $26.35 | $79.05 |
| SLR 29GA Extended Eave Trim 3 ½" x 10'4"* | 5 | $26.35 | $131.75 |
| SLR LP Closure Vent for 16"* | 9 | $10.00 | $90.00 |
| 1"x #10 Pancake Screw (250pc)* | 4 | $14.99 | $59.96 |
| 4'x250' Certainteed Diamond Deck, 10SQ* | 1 | $184.99 | $184.99 |
| Delivery Charge* | 1 | $22.50 | $22.50 |
| Fuel charge* | 1 | $23.00 | $23.00 |
| Tax* | 1 | $286.15 | $286.15 |
| —End of Bernard Building Delivery Jun 20-- | |||
| 1/2"x1"x? Furring for floor insulation support and air gap in roof | $0.00 | ||
| Beam Base* | 10 | $14.67 | $146.70 |
| 1 | $0.00 | ||
| Gutter & Downspout | 2 | $0.00 | |
| LVP Flooring* | 1 | $300.00 | $300.00 |
| Flashing for small roof over bay window | $0.00 | ||
| Bay Window* | 1 | $219.93 | $219.93 |
| Kitchen Window* | 1 | $61.62 | $61.62 |
| Bedroom Window* | 1 | $50.00 | $50.00 |
| Bathroom Window* | 1 | $100.00 | $100.00 |
| Bathroom Door* | 1 | $443.07 | $443.07 |
| Front Door* | 1 | $409.00 | $409.00 |
| Front doorknob* | 1 | $18.47 | $18.47 |
| wifi deadbolt* | 1 | $204.00 | $204.00 |
| 98sqft Carton Vinyl Siding+ | 6 | $485.76 | $2,914.56 |
| 10ft Vinyl Siding Starter Strip+ | 7 | $4.17 | $29.19 |
| 12ft Vinyl Siding J-Channel+ | 17 | $17.06 | $290.02 |
| 12ft Vinyl Siding Corner Outside Post+ | 5 | $57.33 | $286.65 |
| 12ft Vinyl Siding Inside Corner Post+ | 2 | $0.00 | |
| Vinyl Siding Dryer Vent+ | 2 | $26.90 | $53.80 |
| Vinyl Siding Outlet Block+ | 4 | $15.54 | $62.16 |
| 10sqft Vented Soffit+ | 10 | $13.09 | $130.90 |
| Vinyl Trim* | 13 | $16.98 | $220.74 |
| R15 Rockwool | 24 | $80.00 | $1,920.00 |
| R23 Rockwool | 24 | $80.00 | $1,920.00 |
| 2" Foam Board* | 38 | $44.98 | $2,024.10 |
| Window Flashing Tape* | 3 | $13.98 | $41.94 |
| 2"x164' Housewrap Tape* | 4 | $13.98 | $55.92 |
| 50pcs 1/2" sheathing clips* | 1 | $43.98 | $43.98 |
| LVP Underlayment | $0.00 | ||
| Beam Bracket Screws* | 1 | $20.57 | $20.57 |
| 1000pcs 2-3/8" nails* | 2 | $29.98 | $59.96 |
| 1000pcs 3-1/4" nails* | 1 | $43.98 | $43.98 |
| caulk for siding & windows | $0.00 | ||
| Big Gap Spray Foam* | 10 | $6.48 | $64.80 |
| Window Spray Foam* | 2 | $5.98 | $11.96 |
| Hurricane Ties* | 22 | $0.98 | $21.56 |
| $0.00 | |||
| Pex supplies | |||
| PVC | $0.00 | ||
| Roofing tools | $0.00 | ||
| SOLAR RACKS | |||
| 2x4x8' Treated* | 20 | $4.28 | $85.60 |
| 2x4x8' Treated GC* | 4 | $4.68 | $18.72 |
| 2x10x8' Treated* | 2 | $16.98 | $33.96 |
| 15pc 1/2" x 4" Galv Bolt* | 3 | $36.48 | $109.44 |
| 50pc Galv Washer* | 2 | $25.58 | $51.16 |
| 50pc Galv Nut* | 1 | $25.98 | $25.98 |
| ELECTRICAL | |||
| 450w Solar Panel* | 8 | $296.75 | $2,374.00 |
| 1/2"x8' Copper Ground Rod* | 1 | $15.58 | $15.58 |
| 25' 6AWG Copper Ground Wire* | 1 | $27.00 | $27.00 |
| Bronze Ground Clamp* | 1 | $4.98 | $4.98 |
| 1' of 10AWG Wire w/ MC4 ends* | 2 | $6.95 | $13.90 |
| 14' of 10AWG Wire w/ MC4 end* | 4 | $19.95 | $79.80 |
| Feet of RED 8AWG Wire, between panels and MMPT* | 170 | $1.25 | $212.50 |
| Feet of BLK 8AWG Wire, between panels and MMPT* | 170 | $1.25 | $212.50 |
| Feet of BLK 2AWG Wire, between inverter and load center+ | 42 | $3.00 | $126.00 |
| Feet of GRN 8AWG Wire, between inverter and load center+ | 21 | $0.80 | $16.80 |
| 4' of 00AWG Wire w/ ends* | 2 | $49.70 | $99.40 |
| 3/4" 10' conduit* | 8 | $7.51 | $ |
| 3/4" 90° sweep* | 4 | $1.81 | $ |
| 3/4" threaded insert* | 4 | $0.73 | $ |
| 4pc 3/4" threaded insert nut* | 2 | $1.80 | $ |
| 5pc 3/4" conduit coupler* | 1 | $5.37 | $ |
| 1" 10' conduit* | 4 | $10.63 | $ |
| 1" 90° sweep* | 6 | $2.40 | $ |
| 1" threaded insert* | 1 | $0.98 | $0.98 |
| 1" threaded insert nut+ | 1 | $ | $ |
| 1" conduit strap* | 4 | $3.21 | $ |
| 1" conduit coupler* | 2 | $0.88 | $ |
| 1 gang pvc box* | 1 | $9.68 | $9.68 |
| 1 gang pvc cover* | 1 | $3.47 | $3.47 |
| 5pc 3/8 cable clamp* | 3 | $3.58 | $ |
| Victron Energy Ekrano GX* | 1 | $545.78 | $545.78 |
| Victron SmartSolar MPPT 250/70* | 1 | $413.35 | $413.35 |
| Victron Multiplus-II 48-5000-70-95 120V* | 1 | $1,642.95 | $1,642.95 |
| 10kWh Battery* | 1 | $2,483.57 | $2,483.57 |
| 12-Space Load Center* | 1 | $128.00 | $128.00 |
| 30A GFCI Breaker+ | 1 | $58.11 | $58.11 |
| 20A DFCI Breaker* | 10 | $54.62 | $546.20 |
| 15A DFCI Breaker* | 1 | $57.99 | $57.99 |
| RV Outlet* | 1 | $63.98 | $63.98 |
| Generator Inlet* | 1 | $74.19 | $74.19 |
| AC Disconnect* | 1 | $12.98 | $12.98 |
| Load shed relay | 2 | $0.00 | |
| Load shed relay Heatsink | 2 | $0.00 | |
| 1 gang electrical box* | 20 | $0.85 | $17.00 |
| 10pcs outlets* | 2 | $9.98 | $19.96 |
| WR outlet* | 4 | $4.57 | $18.28 |
| Weatherproof Outlet Cover* | 4 | $4.76 | $19.04 |
| Ceiling box with hangar* | 3 | $4.37 | $13.11 |
| Ceiling Box* | 2 | $2.98 | $5.96 |
| 1 gang WR Electrical Box* | 4 | $4.91 | $19.64 |
| 2 gang electrical box* | 4 | $1.98 | $7.92 |
| 1-gang Switch plate* | 2 | $1.20 | $2.40 |
| 2-gang Switch plate* | 1 | $2.57 | $2.57 |
| Outlet plate* | 20 | $1.20 | $24.00 |
| Feet of 14/2* | 250 | $0.36 | $90.00 |
| Feet of 12/2* | 350 | $0.48 | $120.00 |
| Feet of 10/2+ | 25 | $1.71 | $42.75 |
| Exterior lantern light* | 1 | $6.00 | $6.00 |
| Farmhouse Pendant Light* | 1 | $16.00 | $16.00 |
| Exhaust Fan | 2 | $80.00 | $160.00 |
| Mini-Split | 1 | $1,699.00 | $1,699.00 |
| 17in Indoor Black Ceiling Fan With Lights | 1 | $200.00 | $200.00 |
| Weyburn 36in 5 Light Chandelier | 1 | $200.00 | $200.00 |
| Bathroom Light* | 1 | $30.00 | $30.00 |
| 10ft 5-20 cord | 1 | $25.18 | $25.18 |
| cellular wifi | 1 | $129.00 | $129.00 |
| Cellular Antenna | 1 | $99.00 | $99.00 |
| internet per mo | 1 | $10.00 | $10.00 |
| PLUMBING | |||
| Septic Consultant* | 1 | $200.00 | $200.00 |
| Well & Septic Permit* | 1 | $473.00 | $473.00 |
| Septic tank, installed* | 1 | $2185.00 | $2185.00 |
| Drain field, installed | 1 | $6300.00 | $6300.00 |
| Tank-Mart Tri-Wh-2100-4 | 1 | $465.00 | $465.00 |
| First Flush Diverter | 1 | $65.95 | $65.95 |
| Water Heater | 1 | $369.00 | $369.00 |
| Rear Discharge Toilet | 1 | $319.00 | $319.00 |
| Kitchen Sink & faucet & disposal* | 1 | $50.00 | $50.00 |
| Nickel Faucet* | 1 | $7.00 | $7.00 |
| Black Faucet* | 1 | $16.00 | $16.00 |
| Bathroom Sink | 1 | $88.53 | $88.53 |
| Water Pump | 1 | $94.99 | $94.99 |
| Water Filter 30 Micron | 1 | $15.28 | $15.28 |
| Water Filter 5 Micron | 1 | $27.84 | $27.84 |
| Water Filter 0.5 Micron | 1 | $54.96 | $54.96 |
| 4Gal water tank | 2 | $41.15 | $82.30 |
| APPLIANCES | |||
| Cooktop+ | 1 | $107.12 | $107.12 |
| Microwave+ | 1 | $199.00 | $199.00 |
| Trash Compactor* | 1 | $600.00 | $600.00 |
| Mini Dishwasher | 1 | $465.47 | $465.47 |
| Mini Fridge* | 1 | $40.00 | $40.00 |
| TOTAL | $34,871.85 |
+Quantity is approved for purchasing
Suppliers:
- Bernard Building Center
- Indian River Hardware
- WB Underground Utility Construction
- Rental Express for equipment